Real-Time Bluetooth Networks- Shape the World
This page gives a brief overview of the software used in this class.

Keil uVision is a compiler/debugger/simulator developed by ARM. Texas Instruments developed the windows drivers that allow communication with the LaunchPad board. We have developed a suite of the software modules needed to run this course. All software will be free to download and install. There will be five different types of modules: 1) there will be an integrated development environment (IDE) for writing, compiling, downloading, and debugging code on the microcontroller; 2) there will be example code that we discuss during the lectures; 3) there will be starter files for each of the lab; and 4) there will be automatic grader software that tests your lab solutions to see if your solution meets specifications; and 5) TExaSdisplay is a stand-alone application that provides communication with the serial port on the LaunchPad, and implements a very simple oscilloscope and logic analyzer.
IDE
We will be using Keil uVision IDE and be writing software in C. These programs only run on Windows (XP, Vista, 7, 8, or 10.) There will be a way install software on a Macintosh so Windows will run on the Macintosh. There are no solutions for Linux.

Example projects and Lab starter projects
There will be many example projects that run on the TM4C123/MSP432 LaunchPads. You will begin each lab using a starter project. Labs 1 to 5 are ready and Lab 6 will be available soon. There are also four very simple real-time operating systems that demonstrate basic concepts. The following figure shows the TM4C123 directory after the RTBN_Install.exe has been run. There is a similar directory containing all the MSP432 projects.
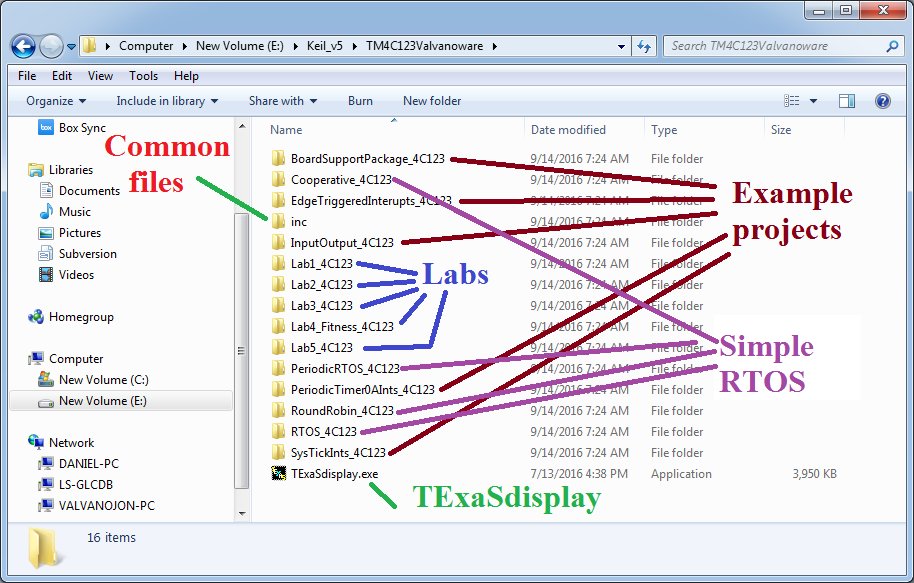
- BoardSupportPackage: example of using the MK-II (LaunchPad+MKII)
- Cooperative: simple cooperative RTOS (LaunchPad)
- EdgeTriggeredInterrupts: example of interrupt called on switch touch (LaunchPad)
- InputOutput: example of input from switch and output to LED (LaunchPad)
- Lab1: starter project for Lab 1, introduction to MKII (LaunchPad+MKII)
- Lab2: starter project for Lab 2, round robin, preemptive, spinlock semaphore (LaunchPad+MKII)
- Lab3: starter project for Lab 3, with blocking and sleeping (LaunchPad+MKII)
- Lab4: starter project for Lab 4, priority scheduler (LaunchPad+MKII)
- Lab5: starter project for Lab 5, file system (LaunchPad+MKII)
- Lab6: starter project for Lab 6, bluetooth(LaunchPad+MKII+CC2650)
- PeriodicRTOS: simple RTOS with 3 main threads and 3 periodic threads (LaunchPad)
- PeriodicTimer0AInts: example of periodic interrupt using the timer (LaunchPad)
- RoundRobin: simple preemptive RTOS with scheduler in C (LaunchPad)
- RTOS: simple preemptive RTOS with scheduler in assembly (LaunchPad)
- SysTickInts: example of periodic interrupt using SysTick (LaunchPad)
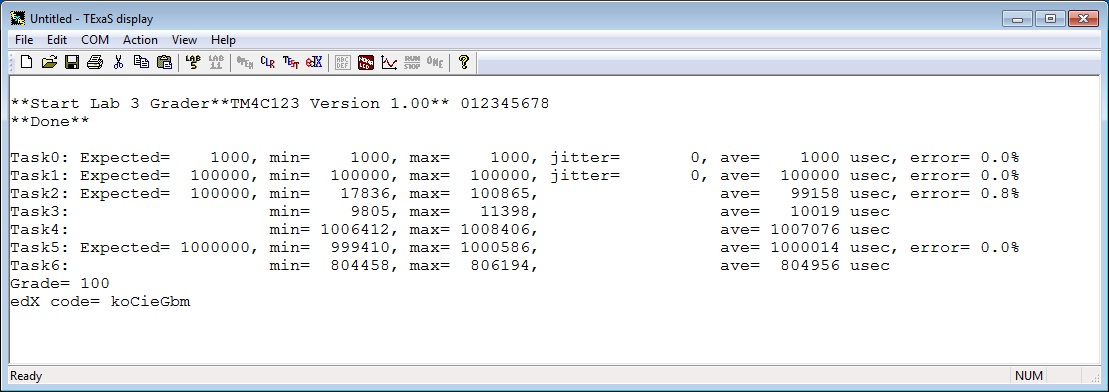
TExaS Lab Graders
We have written DLL extensions to the Keil uVision IDE that will evaluate your lab solutions. We have named this set of DLLs as Test EXecute and Simulate or TExaS. There is also an application called TExaSdisplay that provides interaction with your serial port software running on the LaunchPad. the current version of TExaSdisplay is like HyperTerminal or PuTTy but much simpler. TExaSdisplay also provides a simple oscilloscope and logic analyzer. This class uses the logic analyzer, but not the oscilloscope. Details of how to run the grader for each lab exist within the Lab section of each chapter on edX.
Logic Analyzer
One of the cool technologies of this class will be its logic analyzer. The logic analyzer uses a simple 8-bit global variable on the microcontroller. Bit 7 is always high (to signify logic analyzer data), and the other 7 bits can be set, cleared, or toggled by the user program. Data flows from this 8-bit variable at 10kHz, passed via UART0 through the USB cable to the PC and plotted on the PC using the application TExaSdisplay.

How to run Keil and TExaS on a Mac
A list of what you need:
1. A Mac preferably one that has a Intel Core Duo processor or better
2. A virtualization software. Here are some choices:
a) Parallels http://www.parallels.com/: costs money but the best
b) VMware Fusion http://www.vmware.com/products/fusion/: costs money but the fastest
c) VirtualBox https://www.virtualbox.org/: Its free
Parallels is the most feature rich of the lot but VMware Fusion is the fastest.
3. Windows 7 OS CD from the least expensive sourse you can find.
Order in which you should proceed with the installation
1. Install the virtualization software. The first two options are pretty straightforward, the third I have not run myself. Once you complete your installation, you will be presented with instructions on creating virtual images of the OSs you would like to run.
2. You will install Windows within the virtualization software you choose. Here is the prompt I get from Fusion when I choose File->New Insert the Windows CD and go through the steps of installing the OS. This should take around 45 mins or so.
3. Now you are ready to run Windows. Again, you will open your virtualization application and choose the Windows OS you just installed to be run. My Fusion screen looks like below showing Windows Vista as the OS that I can run: Click on the play button and you will boot the Windows OS. You will be running both Windows and Mac OS at this point. There are some neat features in both Fusion and Parallels that allow you to seamlessly integrate the running of applications from both Operating systems.
4. Install Keil uVision, TExaS, and the windows drivers as described in the download page.
5. Run Keil and connect the board to your Mac using USB. Try the examples in the TM4C123 directory.
Comments from students
An ECE student reports this experience. "I am using a mid-2012 MacBook, trying to run Keil uVision on a Windows 7 image running inside VMWare Fusion. After much frustration, I have found that VMWare Fusion currently improperly handles the USB 3.0 ports on mid-2012 MacBooks, rendering the LM3S1968 eval board unable to properly communicate with the necessary tools. This can be fixed by either running Windows natively (via bootcamp, without virtualization) or by connecting the board via an external USB 2.0 hub. Connecting it through an external hub allows the board to be used inside VMWare Fusion."
An ECE senior student reports: "I was reading through the lab manual for your spring 2013 445M class and read your "run EE 445L/445M/460M software on Macs" instructions. I would like to provide some feedback on that (not the instructions but my experiences on running EE software on macs). I have not tried VMFusion or VirtualBox but I have been running Parallels 7 for the last two years. I have had two macs (high end 2011 macbook pro and low end 2012 retina macbook pro) and both have been able to run Keil, PCBArtist, and even the Xilinx and ModelSim software for my VHDL class flawlessly. Parallels is the more expensive of the 3 but it has served me well for all of my windows software needs, and I would like to confirm that Parallels is probably the safest bet to be able to do the labs for this and other classes. "